
FastPixel Adds User-Agent Exclusions – Here’s What That Means for You


We’re excited to introduce User-Agent Exclusions in FastPixel 1.9.0!
This new feature helps prevent bots, crawlers, and monitoring services from triggering page optimization and consuming your FastPixel pageviews. Here’s how it works and how to set it up.
What is a user agent?
Every browser, bot, or app that requests a page identifies itself with a short string called a user agent. It travels with every request, and it’s how a server can tell a visitor on Chrome apart from, say, Googlebot crawling your pages.
Some requests to your site come from bots, crawlers, and monitoring services rather than real visitors. These requests don’t need the optimized experience intended for your audience, yet until now they could still trigger optimization and count toward your pageviews usage.
That’s where user-agent exclusions come in.
What happens when a user agent is excluded
When a visitor’s user agent matches one of your exclusions, FastPixel will:
- Skip page optimization — the page isn’t added to the optimization queue
- Skip the cached version — the visitor receives the standard, unoptimized page instead
Excluded visitors see your site exactly as it is. This helps keep your FastPixel pageviews focused on the real visitors who benefit from the optimized experience.
Note that this is different from page exclusions, which skip optimization for specific URLs. User-Agent Exclusions work at the visitor level, across your whole site.
What FastPixel excludes automatically
In most cases, you won’t need to configure anything. FastPixel already excludes many common user agents by default, including search engine crawlers such as Googlebot and Bingbot, AI crawlers such as GPTBot and ClaudeBot, SEO tools such as AhrefsBot and SemrushBot, social preview bots, and uptime monitoring services.
These defaults are always active, even though they don’t appear in the plugin interface. You can find the complete built-in list in our User-Agent Exclusions documentation.
The User-Agent Exclusions field is only for the entries you add yourself. Your additions are combined with the built-in list.
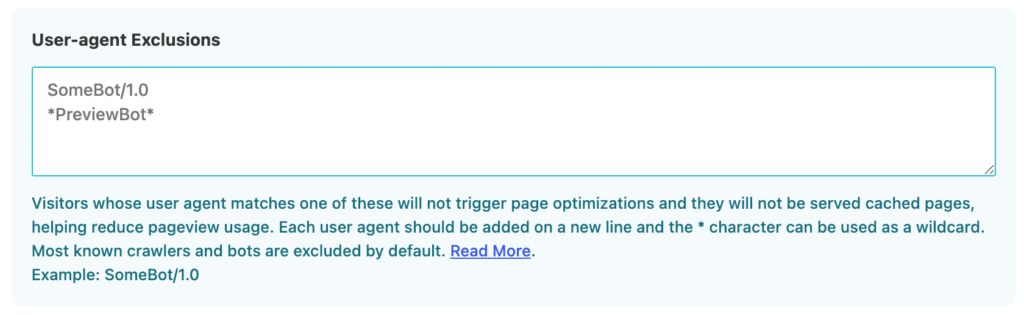
How to add your own rules
Adding your own exclusions takes a minute. Here are the rules:
- One user agent per line
- Matching is case-insensitive — previewbot, PreviewBot, and PREVIEWBOT all behave the same
- Matching is a “contains” check — FastPixel looks for your text anywhere inside the visitor’s full user-agent string, so a distinctive fragment is enough
- The * character can be used as a wildcard for more advanced patterns, such as *PreviewBot*
For example, if a monitoring service identifies itself as CompanyPreviewBot/1.2, adding CompanyPreviewBot or companypreviewbot is enough to exclude it.
One tip: be specific. Because matching is a “contains” check, a short word can match far more than you intended, an entry like bot would catch a huge number of user agents. Use a distinctive token, and add surrounding characters, such as CompanyPreviewBot/, if you need to narrow it down.
When should you add a custom exclusion?
Most site owners can rely entirely on FastPixel’s built-in exclusions. Custom rules are useful when your website receives requests from a private monitoring service, an internal crawler, a development tool, or another automated system that isn’t included in the default list.
For example, your development team may use an internal crawler to check links or monitor website changes. That crawler still needs access to the original page, but it doesn’t need to trigger optimization or consume FastPixel pageviews. Adding its distinctive user-agent string to the exclusions field keeps those automated requests separate from your real visitor traffic.
Before adding a rule, check the user-agent string carefully and use the most distinctive part of it. This helps you avoid excluding regular browsers or legitimate visitors by mistake.
Performance-testing tools are never excluded
Tools that measure your site’s speed are always served the cached, optimized page, even if you add a matching entry. This protection covers Google PageSpeed Insights / Lighthouse, GTmetrix, Pingdom, and WebPageTest.
This is intentional. Your scores should reflect the optimized version of your site, the one your real visitors receive.
How to get started
- Update to FastPixel version 1.9.0 or later.
- Go to your WordPress Dashboard > FastPixel > Pages > User-agent Exclusions.
- Add your custom entries, one per line, and save. If you don’t have anything custom to add, leave the field empty.
The built-in exclusions require no action on your part. For the full technical reference, see the User-Agent Exclusions documentation.
It’s another step, alongside features like Object Cache, toward making FastPixel an even more complete performance solution for WordPress.
Stay tuned for more!
Boost Core Web Vitals and performance with FastPixel!
Optimize loading times, enhance user experience, and give your website the performance edge it needs.



 English
  French