Easy Guide on How to Leverage Browser Caching in WordPress

If you’re a WordPress user looking to optimize your website’s performance, you’re probably already aware of the significant benefits of leveraging browser caching. Essentially, it’s a technique that can drastically improve your website’s loading speed.
You might wonder why is browser caching in WordPress such a big deal. Let’s delve deeper into this topic as we explore its importance and how it can be achieved.
Understanding browser caching
Browser caching, in simple terms, refers to temporarily storing certain website resources on a user’s local device (usually in their web browser) after they initially visit a website. These resources typically include images, JavaScript, and CSS files. When a user revisits the website, these cached resources are retrieved from their local storage, resulting in a noticeable improvement in loading speed.
It’s worth noting that different web browsers employ various caching mechanisms. For example, the Brave browser prioritizes privacy, while Firefox aims for a balance between privacy and performance in handling cached content.
If you’re interested in learning more about WordPress caching in general, make sure to check out our WordPress Caching 101 article.
How does browser caching work on WordPress?
When a user accesses a website, several processes occur in the background to make the site visible. These processes involve transmitting various components of the website, such as content, images, stylesheets, and scripts, from the website’s server to the user’s browser.
Here’s a simplified breakdown of these steps:
- The visitor enters a URL in their browser.
- The browser generates an HTTP request to the server hosting the website.
- The server compiles all the necessary data and sends it to the user. This is often the point where users experience a slowdown, which can be mitigated by optimizing scripts and image sizes.
- Once the data is transmitted, the browser can finally display the website. This process repeats when users navigate to other pages on the site. However, numerous server requests simultaneously can lead to poor performance, making website optimization crucial.
Caching plays a significant role in both web browsers and software applications. It involves temporarily storing data on your local disk, referred to as “Web cache” or “HTTP cache.” When you revisit the same website, the browser retrieves the stored information from your computer, reducing the need to download content from the website’s server.
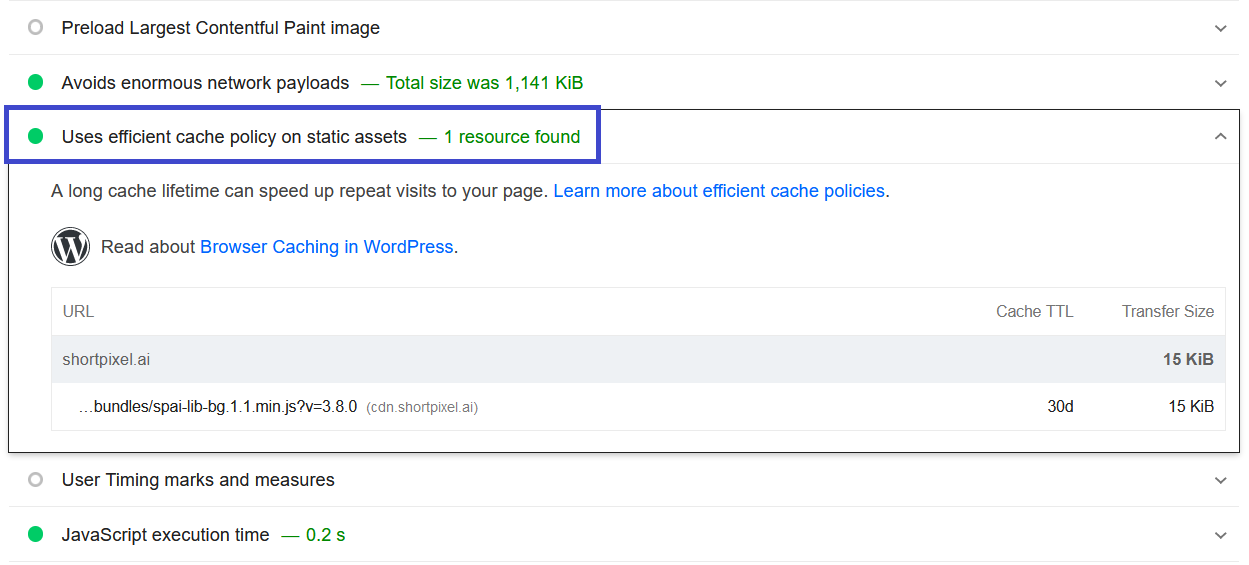
To determine if your WordPress website effectively leverages browser caching, you can use tools like PageSpeed Insights. The tool will provide optimization scores for mobile and desktop, along with suggestions for improvement. Leveraging browser caching by serving static assets with an efficient cache policy is a common recommendation to enhance performance.
Now that we’ve explored the fundamentals of browser caching and its importance, let’s discuss how you can implement it in your WordPress website. We’ll cover various methods, including manual configuration and the use of plugins, in order to help you achieve optimal performance.
Manual browser caching configuration
If you don’t feel comfortable editing your server files, you can scroll down on how to leverage browser caching using a plugin instead.
If you have access to your server files and are comfortable making direct adjustments to them, you can easily incorporate instructions that enable browser caching.
The process for implementing these headers varies depending on your server. In the following sections, we will cover how to enable browser caching on the most common configurations: Apache and Nginx.
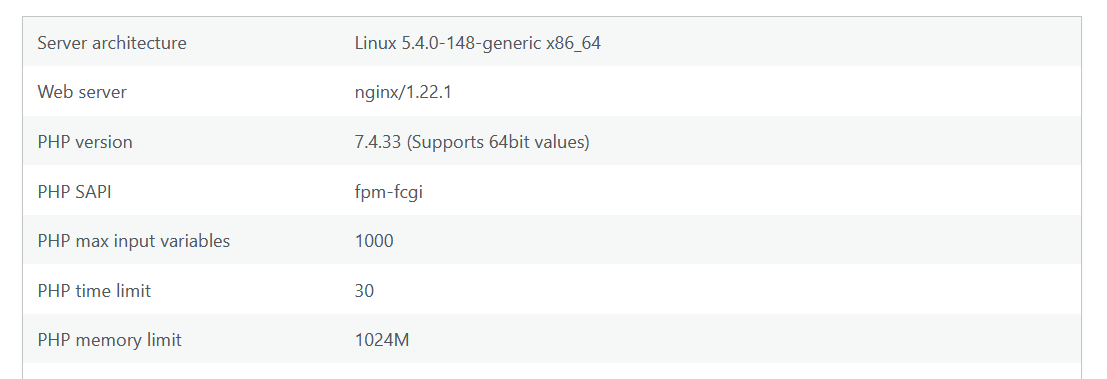
If you’re unsure about the server you’re currently using on your WordPress site, follow these steps:
- Access your WordPress admin dashboard.
- Click on “Tools.”
- Select “Site Health.”
- Navigate to the “Info” tab.
- Next, click “Server” to expand the dropdown menu.
- Finally, review the information displayed under the “Web server” section.”
Leveraging browser caching on an Apache server
If your website is hosted on an Apache server, you will need to make changes at the site-wide level within the .htaccess file, typically located in your main WordPress directory (usually public_html). .htaccess files are plain text files that contain directives and permissions for the directories they pertain to, and the .htaccess file in your root directory affects your entire site.
To edit the .htaccess file, you can typically access your server files either through your hosting control panel, using an FTP client, or by using a File Manager plugin.
First, navigate to your WordPress root folder. If you cannot locate the .htaccess file, you may need to reveal hidden files. If it is still not visible after revealing hidden files, you will need to create a new .htaccess file in this folder.
Once you have located or created the primary .htaccess file, open it using your hosting control panel’s file editor or download the file and open it in a code or text editor. This is where you will implement the necessary changes.
Setting the Cache-Control Header in Apache
First, let’s configure the Cache-Control header. Add the following code at the bottom of the file, below the line that says “# END WordPress”:
<filesMatch ".(ico|pdf|flv|jpg|jpeg|png|gif|svg|js|css)$">
    Header set Cache-Control "max-age=31536000, public"
</filesMatch>
This code applies caching to all files with the extensions listed in the first line, specifying a maximum expiration period of 31536000 seconds (equivalent to 365 days), and designating that files can be cached on a public server, similar to a Content Delivery Network (CDN).
If you wish to instruct the browser to store the cached files only on the client’s computer, you can replace “public” with “private” in the provided code.
Alternatively, you can set different Cache-Control headers for specific file types. For example:
<ifModule mod_headers.c>
    <filesMatch "\.(ico|pdf|flv|jpg|jpeg|png|gif|svg)$">
        Header set Cache-Control "max-age=31536000, public"
    </filesMatch>
    <filesMatch "\.(css|js|php)$">
        Header set Cache-Control "max-age=31536000, private"
    </filesMatch>
</ifModule>
This code allows image files to be cached publicly while limiting .js and .php files to private caching.
Wondering what’s the difference between public and private caching?
- Public caching: These resources set as ‘public’ benefits all users who visit the website. Each user’s browser independently caches these resources, reducing the need to re-download them from the server on subsequent visits.
- Private caching: These resources are set as ‘private’ for individual user caching, ensuring privacy and faster loading for each user without sharing these specific resources with others. For example, someone’s personalized settings or preferences could be considered private caching, ensuring that these settings are stored locally in the user’s browser cache for faster loading.
While the distinction between private and public caching makes more sense with dynamic, personalized content, it still plays a role in managing how static resources are stored in a user’s cache as well.
Public caching benefits all users by reducing server load, while private caching can be useful for specific content that requires a personalized touch or privacy.
Setting the Expires Header in Apache
Next, add the Expires header to inform the browser when to replace cached files with new versions. Paste the following code below your Cache-Control rules:
<IfModule mod_expires.c>
    ExpiresActive On
    ExpiresByType text/html "access 1200 seconds"
    ExpiresByType text/css "access 1 month"
    ExpiresByType text/javascript "access 1 month"
    ExpiresByType text/x-javascript "access 1 month"
    ExpiresByType image/jpeg "access 1 year"
    ExpiresByType image/jpg "access 1 year"
    ExpiresByType image/png "access 1 year"
    ExpiresByType image/svg "access 1 year"
    ExpiresByType image/gif "access 1 year"
    ExpiresByType application/pdf "access 1 month"
    ExpiresByType application/javascript "access 1 month"
    ExpiresByType application/x-javascript "access 1 month"
    ExpiresByType application/xhtml+xml "access 1 month"
    ExpiresByType application/x-shockwave-flash "access 1 month"
    ExpiresByType image/x-icon "access 1 year"
    ExpiresDefault "access 1 month"
</IfModule>
In this code, each ExpiresByType directive assigns an expiration period to a specific file type. These values are not fixed, and you may need to adjust them to suit your requirements. Generally, image files are rarely updated and can be cached for longer durations.
The last line serves as a catch-all for any file type not explicitly mentioned above, defaulting to a 1-month expiration period.
After completing these edits, save the .htaccess file (and re-upload it via FTP if necessary). Then, perform a speed test in an incognito browser to evaluate the performance of your web pages.
Leveraging browser caching on an Nginx server
To instruct your Nginx server to include Cache-Control and Expires headers, you will need to modify your server’s configuration file (usually named “nginx.conf”) using either your server control panel editor or a code editor.
Here are the required adjustments:
Setting the Cache-Control Header in Nginx
Insert the following code within the “server” block in your configuration file:
location ~* \.(ico|pdf|flv|jpg|jpeg|png|gif|svg|js|css|swf)$ {
    expires 365d;
    add_header Cache-Control "public, no-transform";
}
This code sets the maximum expiration period for the specified file types to 365 days. You have the flexibility to modify this period and the included file types as needed. Additionally, it designates these files as publicly cacheable, such as on CDN servers, rather than solely in the browser’s local storage. To make your assets privately cached, replace “public” with “private” in the provided code.
Setting the Expires Header in Nginx
Within the same “server” block, paste the following code to include Expires headers:
location ~* \.(jpeg|jpg|png|svg|gif)$ {
    expires 365d;
}
This configuration sets your image assets to expire after one year. For files with different expiration periods, you can replicate this code in the same section, change the file extension names, and specify a different time frame, as demonstrated below:
location ~* \.(html|css|js)$ {
    expires 30d;
}
After making these adjustments, save your configuration file and restart Nginx. Then, perform a speed test in an incognito browser to assess the performance of your web pages.
Implement browser caching using a plugin
If you’re wary of editing your .htaccess file or simply prefer a more user-friendly approach, a caching plugin can simplify the process. Here are a few plugins that can help you leverage browser caching in WordPress:
FastPixel
With FastPixel, all you need to do is to install and activate the plugin. FastPixel will automatically set things up and make the required adjustments to enable browser caching.
W3 Total Cache
To date, we consider W3 Total Cache to be the top choice for browser caching thanks to its extensive array of customizable settings and features.
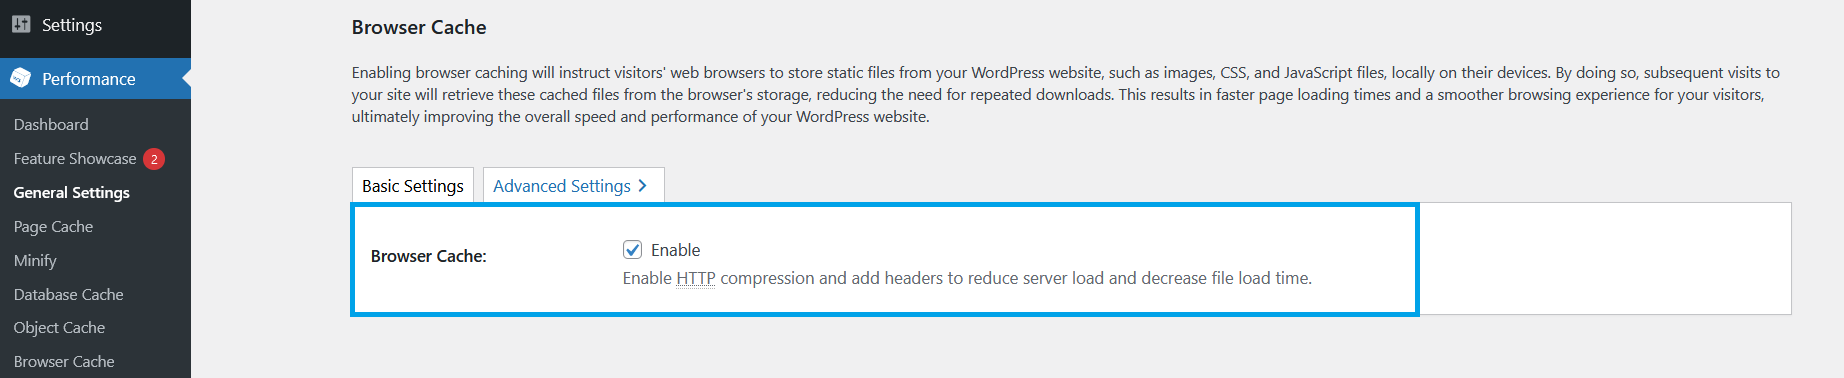
- Download and install the W3 Total Cache plugin.
- Navigate to Performance > General Settings > Browser Cache, and enable this setting.
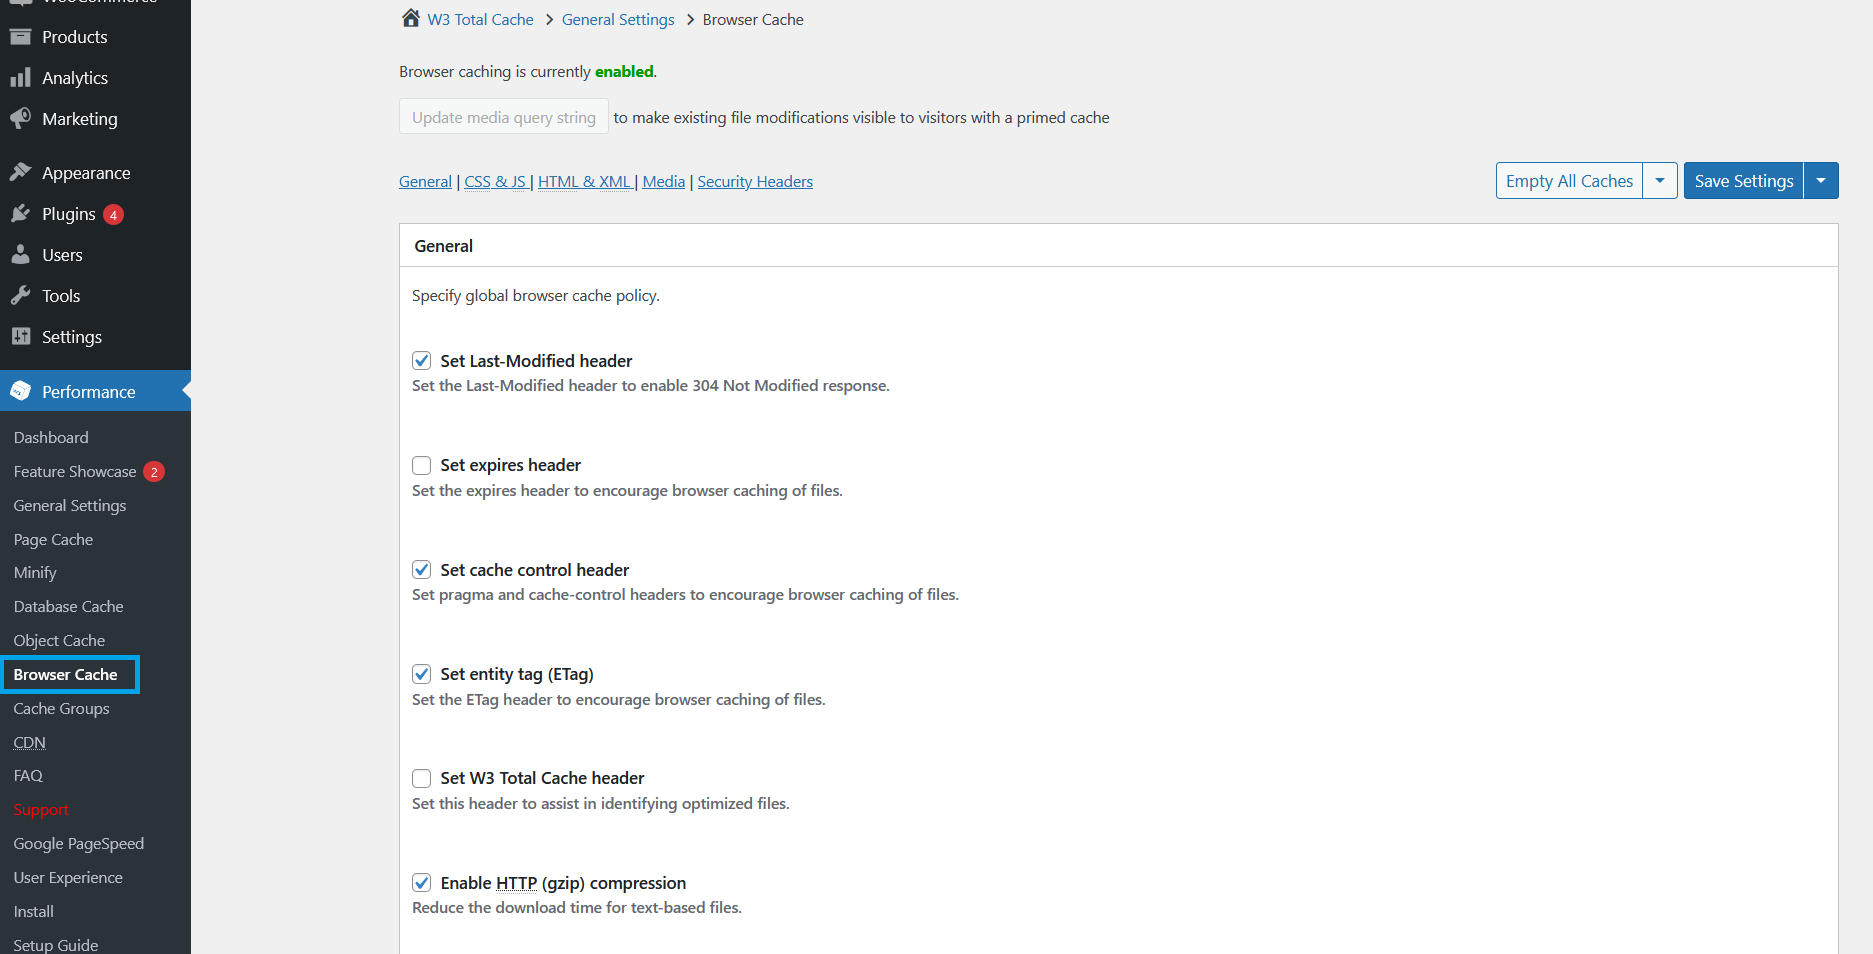
- Click on “Advanced Settings” or navigate to Performance > Browser Cache to set up the cache policies.
- Save the settings.
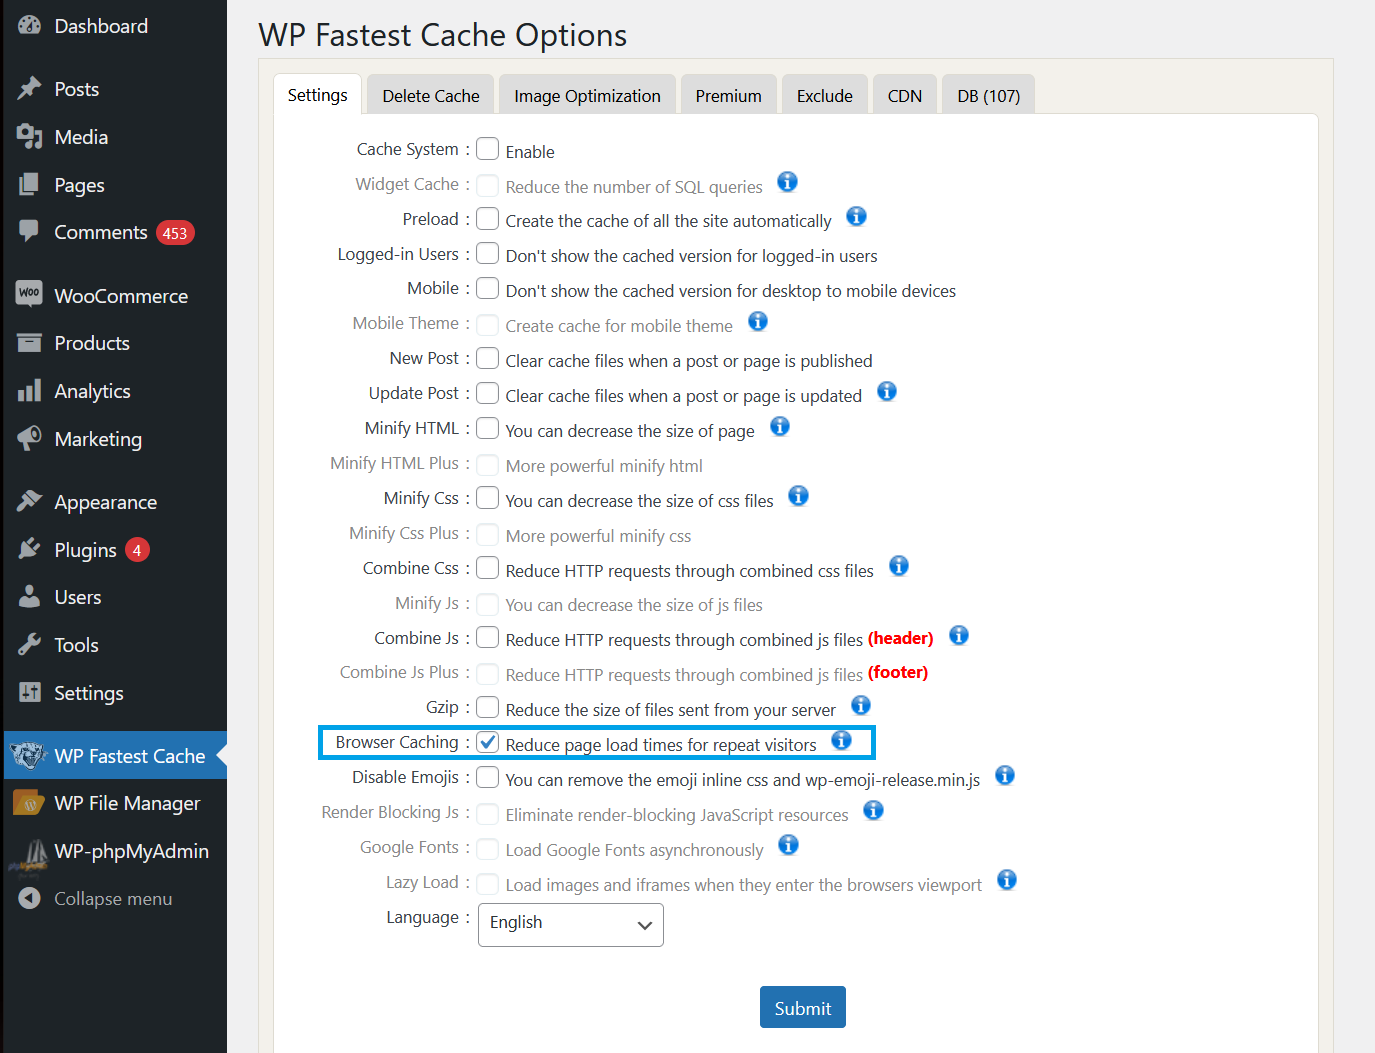
WP Fastest Cache
WP Fastest Cache is another solid contender in terms of general caching, although it offers only a simple option to enable browser caching.
- Download and install the WP Fastest Cache plugin.
- Access the plugin settings via your WordPress dashboard > WP Fastest Cache.
- Enable Browser Caching by checking the appropriate box.
- Click “Submit” to apply the changes.
LiteSpeed Cache
Litespeed Cache proves to be another robust choice, especially when your website is hosted on a LiteSpeed server. However, it’s important to note that without such a server, you won’t be able to utilize the plugin’s caching functionality; nevertheless, you can still leverage its other optimization features.
- Install and activate the LiteSpeed Cache plugin.
- Go to the plugin settings by navigating to your WordPress dashboard > LiteSpeed Cache > Cache > Browser, and enable this setting.
- Save the settings.

WP Rocket
If you prefer a premium plugin, you simply have to purchase, install, and activate the plugin. WP Rocket will automatically configure expiration settings for specific file types and make necessary modifications to your .htaccess file to leverage browser caching.
Dealing with third-party scripts on WordPress
Tip: Every additional third-party script on your WordPress website can impact its performance. Try to keep the count to a minimum.
There are situations where performance issues persist even after using browser caching. This can be especially frustrating if your website relies on a variety of third-party scripts. These resources are external pieces of code or applications integrated into a WordPress website to add various functionalities, such as analytics, social media sharing buttons, video embeds, e-commerce plugins, and more, enhancing the website’s features and capabilities.
A common problem with third-party scrips is the short expiration times that are usually provided for security and data integrity reasons. As a result, web developers often receive messages suggesting the use of browser caching, especially when working with WordPress websites. While browser caching can certainly help, it’s not a one-size-fits-all solution. Sometimes the root of the problem lies deeper.
To fix this, be sure to reduce the number of unused third-party scripts on your site. The more third-party scripts you have, the greater the potential for performance bottlenecks. Ideally, you should keep the number of such scripts to a minimum. This may require some difficult decisions about which third-party resources are truly essential to your site’s functionality and which can be sacrificed in the interest of optimizing performance.
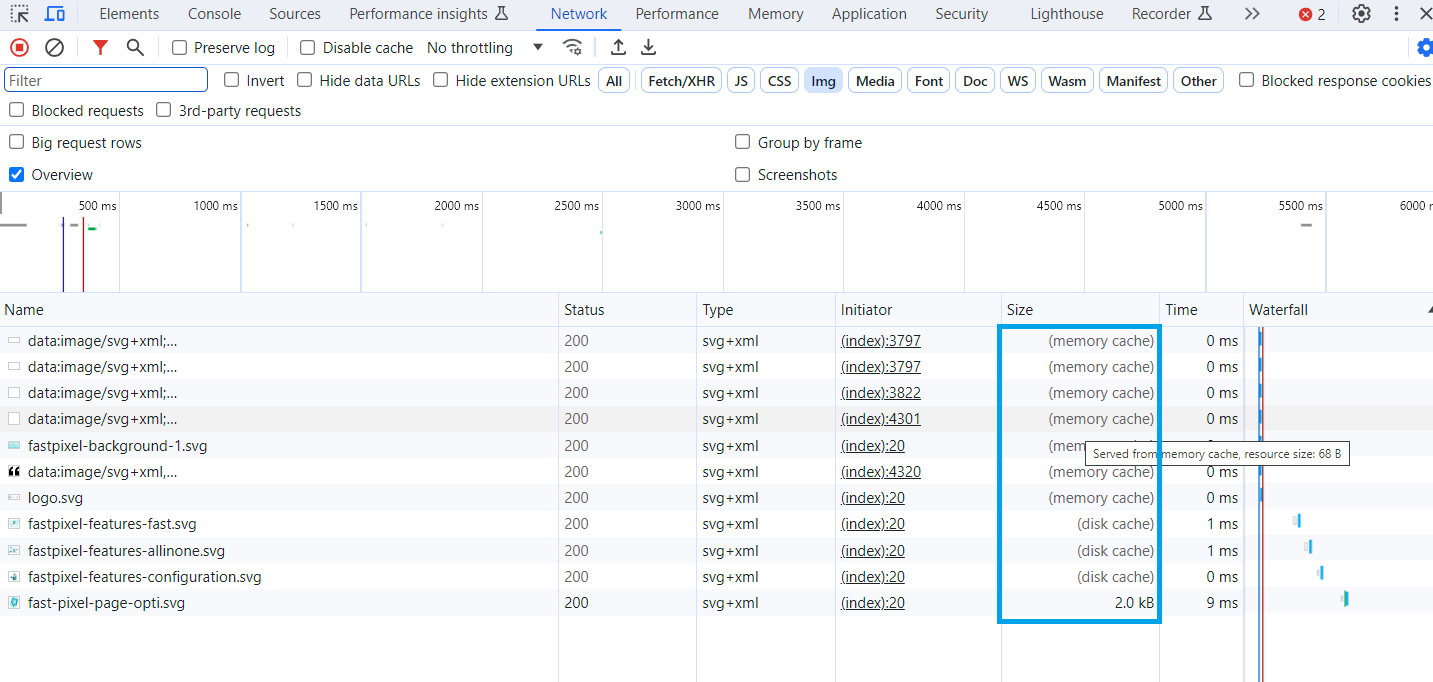
How to verify cached responses in Chrome DevTools
To inspect the content stored in the browser’s cache and identify the resources it’s retrieving from there, follow these steps in Chrome DevTools:
- Begin by opening DevTools. You can do this by pressing Control+Shift+J (or Command+Option+J on a Mac).
- Once DevTools is open, navigate to the Network tab.
Within the Chrome DevTools interface, you can utilize the Size column to verify whether a particular resource has indeed been cached. This is an essential step because Chrome often serves frequently accessed resources directly from its memory cache, which offers fast retrieval speeds. However, it’s important to note that this cache is cleared whenever the browser is closed.
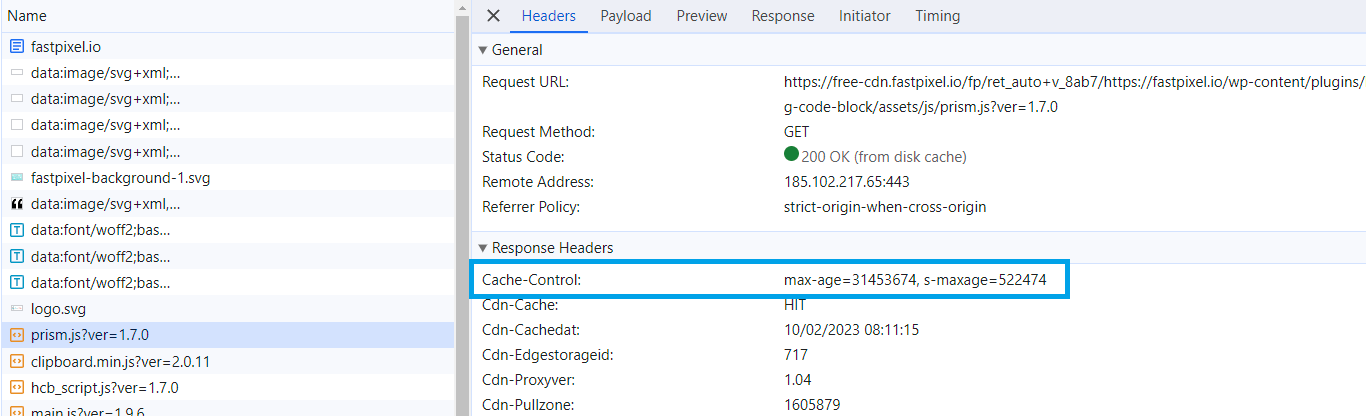
To further verify that a resource’s Cache-Control header is correctly configured as expected, inspect its HTTP header data:
- Click on a resource that can be found under the Name column in the table with requests.
- Navigate to the Headers tab for more details on the HTTP header information, and check the “Cache-Control” header.
Conclusion
In conclusion, enabling browser caching is a crucial strategy for optimizing your WordPress website’s performance. It significantly enhances loading speed, ensuring a smoother and faster user experience. By implementing browser caching, you allow certain resources to be stored locally on a user’s device, reducing the need for repeated requests to your server and improving overall speed. To determine whether your website effectively leverages browser caching, tools like PageSpeed Insights can be great in assessing its performance.
The manual configuration method involves making adjustments to your server’s configuration files. Alternatively, if you prefer a user-friendly approach, WordPress plugins like FastPixel can simplify the process, allowing you to leverage browser caching with just a few clicks.
However, remember that optimizing website performance goes beyond browser caching. It’s essential to manage third-party resources and reduce their impact on loading times. Additionally, monitoring your website’s cached responses using tools like Chrome DevTools can help you verify that caching is functioning as intended.
Incorporating browser caching into your WordPress website is a fundamental step toward achieving the need for speed, ensuring that your site not only looks great but also performs well.
Test the performance of your WordPress site for free.
Take a brief pause to check the performance of your WordPress site for free to measure the before and after results to see the value browser caching adds to your site.