
FastPixel Global Cache
3 min read
Global Cache stores copies of your pages on FastPixel’s global CDN network and delivers them from locations closest to your visitors.
Logged-in users, carts, checkouts, forms, and other pages that need to stay dynamic continue to load directly from your website.
Before you start #
Make sure:
- Your website is already connected to FastPixel.
- You have access to your domain’s DNS settings.
- You know your website server’s IP address. If you are unsure, ask your hosting provider.
Because setup involves DNS changes, we recommend making the change at a quieter time for your website. DNS updates are often visible within a few minutes, but in some cases can take several hours.
Using Global Cache #
Open the activation link provided by FastPixel. After opening it, go to Connect Website in your FastPixel dashboard.
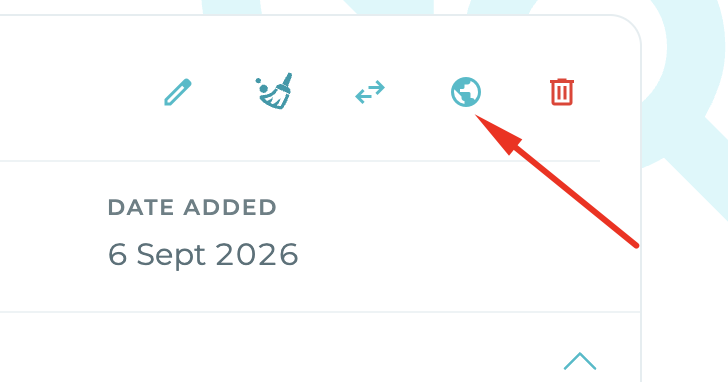
A globe icon will appear next to your website. Click it and open the Global Cache section.
Set up Global Cache #
1. Enter your site IP address #
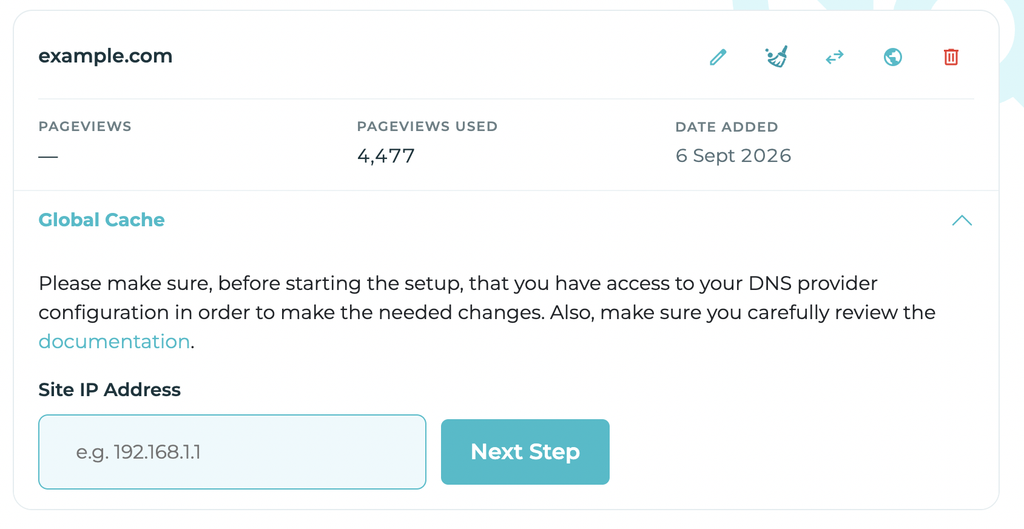
Open your website settings using the globe icon and find Site IP Address under Global Cache.
Enter the IP address of the server where your website is hosted, then click Next Step.
FastPixel will prepare Global Cache for your website.
If you see “Invalid IP address”, confirm the correct server IP with your hosting provider.
2. Add the CNAME record #
FastPixel will show you the DNS record that needs to be added.
| Field | What to enter |
|---|---|
| Type | CNAME |
| Name | The domain shown in FastPixel |
| Value | The address shown in FastPixel, ending in .b-cdn.net |
Add the record exactly as shown in your DNS provider.
Using Cloudflare? Keep the proxy disabled for this record. The cloud icon should be gray (DNS only), not orange.
If you are connecting your root domain, such as example.com, your DNS provider may not allow a standard CNAME unless you remove the A record first.
FastPixel automatically checks your DNS every 15 seconds.
Once you see:
“DNS record detected. You can proceed.”
click CNAME is set – Next Step.
If FastPixel continues showing Waiting for DNS propagation…, you can safely leave the page and return later.
3. Add the SSL TXT record #
FastPixel will now request an SSL certificate and show you a TXT record.
| Field | What to enter |
| Type | TXT |
| Name | The _acme-challenge... name shown in FastPixel |
| Value | The verification value shown in FastPixel |
Copy both values exactly as displayed.
The TXT record has an expiry date, so make sure you add it before that date. If it expires, return to the previous step and request a new one.
Once FastPixel detects the record, click TXT record added – Complete SSL.
You’re done #
When the dashboard shows:
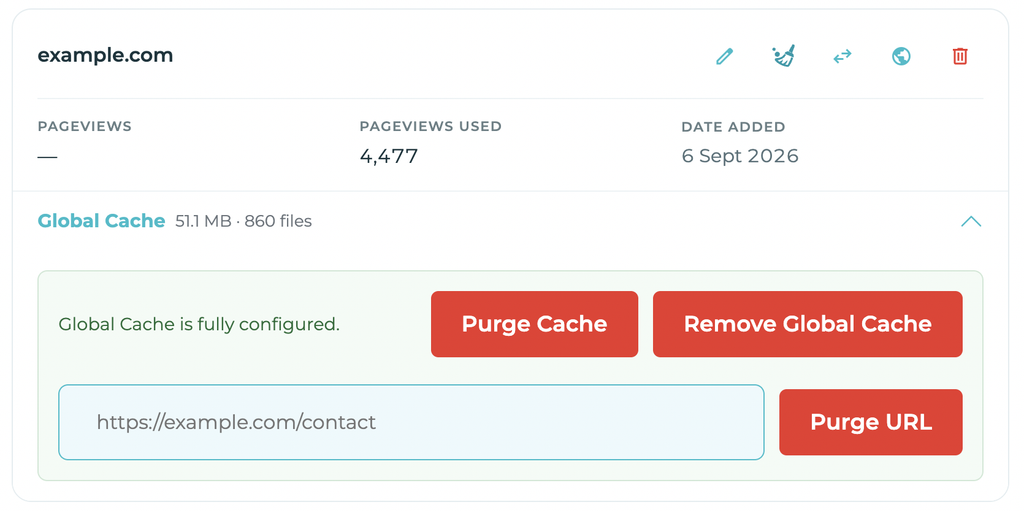
“Global Cache is fully configured.”
Global Cache is active.
Your public pages are now served using our global CDN network, from over 119 locations.
Managing your cache #
You can manage Global Cache at any time by clicking the globe icon next to your website.
Purge Cache #
Use Purge Cache when you want to clear the cached version of your entire website.
This is useful after larger changes such as a redesign, theme change, or plugin update.
Pages will be cached again as visitors access them.
Purge URL #
If you changed only one page, use Purge URL instead.
Paste the full URL, for example:
and click Purge URL.
The URL must belong to the website you are managing.
Storage used #
The Global Cache section also shows how much storage your cached content is using and how many files are currently cached.
What Global Cache does not cache #
Global Cache automatically avoids pages and sessions that need to remain live.
This includes logged-in users and active sessions, WordPress admin and login pages, previews, search results, feeds, sitemaps, carts, checkout pages, account pages, payment flows, and similar dynamic content.
In practical terms, shoppers and logged-in users receive live pages, while regular visitors receive the cached version whenever possible.
Troubleshooting #
| Problem | What to do |
| Waiting for DNS propagation… | Check that the DNS record matches the values shown in FastPixel. Make sure the record type is correct and, if you use Cloudflare, that the proxy is disabled. DNS changes can sometimes take several hours. |
| SSL validation failed… DNS may not have propagated yet | Check the TXT record again, wait a few minutes, and retry. |
| Invalid state for this operation | Reload Connect Website and open the globe icon again. FastPixel will return you to the correct setup step. |
| Please set the site IP address first | Return to the first step and enter your server’s IP address. |
| Global Cache zone already exists for this domain | Setup has already been started. Reload the page and reopen the Global Cache settings to continue. |
| Storage zone creation failed or Pull zone creation failed | Wait a minute and try Next Step again. If the problem continues, contact FastPixel support. |
| Invalid IP address | Ask your hosting provider for the exact server IP address. |
| URL does not match the domain | Make sure the URL entered under Purge URL belongs to this website. |
| Your site still shows old content | Use Purge URL for one changed page, or Purge Cache if multiple pages were updated. |
| You changed hosting providers or your server IP changed | Open Global Cache settings, update Site IP Address, and save the new IP. |
Still need help? #
Contact FastPixel support and include your domain name, the setup step you are currently on, and the exact error message shown in your dashboard.


 English
  French